|
Thanks to
| Back to main page |
<application name="John Doe's Hardware" database="mysql://localhost/jdhard">
</application>
The name attribute specifies an optional name that will be used in the main window and some others. Database is the URL of the database used by the application. You can't at this time (and you seldom need to) use more than only one database.
In your application, as we said, you need to specify the information about your database structure. You will do it using <table>, <field>, and <relationship> tags:
<table name="customers">
	<field name="number" type="integer" pk size="4" />
	<field name="lastname" type="char" size="20" />
	<field name="name" type="char" size="20" caption="First Name"/>
</table>
<table name="invoices">
	<field name="number" type="integer" pk size="8" default="0" />
	<field name="customer" type="integer" size="4" />
	<field name="date" type="char" size="12" />
	<field name="total" type="real" size="10" />
	<field name="notes" type="char" size="150" />
</table>
<table name="products">
	<field name="code" type="char" pk size="12" />
	<field name="description" type="char" size="30" />
	<field name="price" type="real" size="8" default="0.00" />
</table>
As you can see, declaring a table simply involves including its name, and for each field, the field name, type, size, if it is part of the table's primary key, and a default value, all but the name are optional. The field types are char, integer and real, default type is char.
Tables are related to each other, so we need to declare relationships as well. We use a <relationship> block with both parent and child table as attributes. The <link> tags into the relationship block states which field in a table matches each field in the other:
<relationship name="cust-inv" parenttable="customers" childtable="invoices">
	<link parentfield="number" childfield="customer" />
</relationship>
<view name="Products" master="products">
	<field datafield="code" caption="Code" browseenabled editenabled />
	<newline/>
	<field datafield="description" caption="Description" editenabled />
	<newline/>
	<field datafield="price" caption="Price" editenabled />
</view>
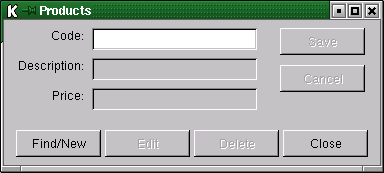
This is a simple form, all the data will go to a single table, specified as the master table of the view. The view also has a name to handle it, and to use as a window caption.
Fields are defined in it, they must match to the view's master table, as long you do not specify explicitly a different table. You must specify a datafield by its name, and some interface stuff.
The <newline/> tag is a layout marker. We'll see layout management later. To give this stuff a try, add a start attribute to application tag
<application name="John Doe's Hardware" database="mysql://localhost/jdhard" start="products">
and run niles with the XML file (pick it here) as a parameter. You will get a window like this:
We add a new table for product categories, and a field in products table for category number. These two tables must be linked with a relationship as well:
<table name="categories">
	<field name="number" type="integer" pk size="2" />
	<field name="description" type="char" size="30" />
</table>
...
<relationship name="cat-prod" parenttable="categories" childtable="products">
	<link parentfield="number" childfield="category" />
</relationship>
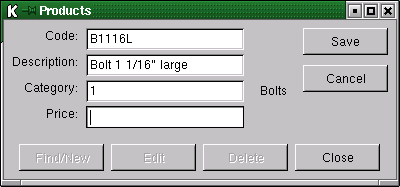
Our user can remember those numbers, but to get sure, he'll appreciate if the category description appears next to the number. So we will add a new kind of tag into the view:
<view name="Products" master="products">
	<field datafield="code" caption="Code" browseenabled editenabled />
	<newline/>
	<field datafield="description" caption="Description" editenabled />
	<newline/>
	<field datafield="category" caption="Category" editenabled />
	<lookupfield datafield="cat-prod.description"  />
	<newline/>
	<field datafield="price" caption="Price" editenabled />
</view>
Providing that we have some categories defined in the table, when we input a category number, the proper description appears in a label at the right (pick the code here):
In some cases, it's more worthy just put a list or combo box and simply choose the detailed value, without bothering about the real value of the key. To do so, delete the category field, and change the lookupfield to:
<lookupfield datafield="categories.description" caption="Category" showas="combo"/>

</view>

There are still a lot of details and small tricks to consider. Please read the tag reference for throughly information about each option available.
<menu>
	<submenu caption="Forms">
		<menuitem caption="Customers" />
		<menuitem caption="Products" />
		<menuitem caption="Exit" action="exit"/>
	</submenu>
	<submenu caption="Sales">
		<menuitem caption="Invoices" />
	</submenu>
	<submenu caption="Reports">
	</submenu>
</menu>
<toolbar>
	<button caption="Products" picture="producticon.png"/>
	<button caption="Customers" />
	<button caption="Invoices" />
</toolbar>
Having defined a menu, a toolbar, or both, there is no more need for start attribute in the <application> tag, as the application will start just showing the main window with the menu or toolbar. You still can have a start defined if you wish, in order to show a logon dialog or anything else.

The only thing to be aware is the action attribute. action can be present in either menuitem and button, and triggers the specified action, that can be showing a view, or trying to run a piece of code. Coded events will be discussed later.